はつねの日記

Kinect, Windows 10 UWP, Windows Azure, IoT, 電子工作

Let's use Azure Communication Services from the client

この記事は「Azure Communication Servicesをクライアントから使おう - はつねの日記」の英語翻訳となります。
This article is an English translation of "https://hatsune.hatenablog.jp/entry/2020/09/29/004734".
azure.microsoft.com
I'm looking into various ways to use Azure Commucication Services, which was announced for preview release at Microsoft Ignite 2020, through WPF apps (.NET Core).

What is Azure Communication Services?

Azure Communication Services is a service on Azure that enables communication between devices with video, voice, chat and text messaging.

It uses the same reliability and security-conscious infrastructure as Microsoft Teams, and the cloud side can add features like Teams' communication features to the app without writing any specific code.

Starting in October 2020, you'll be able to communicate via SMS and capture phone numbers to make and receive calls, but as of now, chat (remember Teams' chat) and voice and video calls (remember Teams' video conferencing) are still available in preview.

Try Chat first.

Configure the cloud side

If you want to use Azure Communication Services, create "Communication Services" in Azure Portal.
f:id:hatsune_a:20200928231054p:plain
Just specify a subscription, resource group, and name the resource to quickly create it.
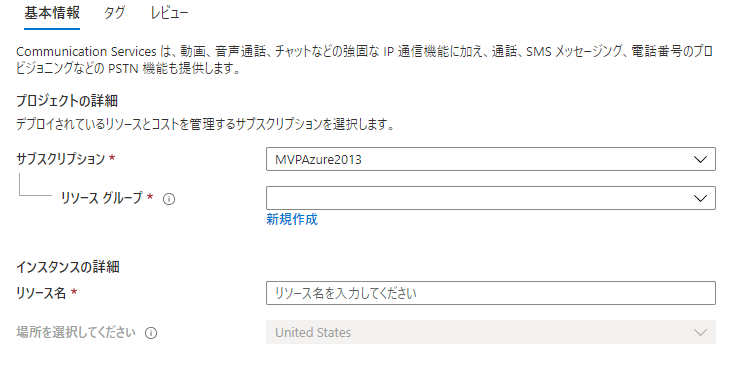
f:id:hatsune_a:20200928231242p:plain
Unfortunately, you can only select the location (location) in the US yet, but we hope to be able to specify the Japanese region when the GA.
Once the creation is complete, you'll be able to create a
Resource name.communication.azure.com
An "endpoint" called "Endpoint" and a "key" to access it will be generated.
From the app, connect to Azure Communication Services with the endpoint + key.

Create the client side.

Now that we have the cloud side ready, let's create a client app. Sample apps and sample code are all examples of web apps and it's unknown how far we can go with just a Windows app, but let's try to do it as far as we can.

New Projector and Creation in WPF App (.NET Core)

Launch Visual Studio 2019 and create a new app from a WPF app (.NET Core) template. NET Core should be 3.1.

The main reason we're using .NET Core instead of .NET Framework is that we want to use a C# 8.0 asynchronous stream called await foreach. I'll explain why we want to use it later.

C# 8.0 is compatible with .NET Standard 2.1, so with the .NET Framework, there is no .NET Standard 2.1 implementation version, and .NET Core must be 3.0 or higher.

Let's nuget!

Once the new project is created, add the SDK in nuget.
f:id:hatsune_a:20200928233503p:plain
Check the Include Preview Release checkbox to add the following two SDKs

  • Azure.Communication.Administration
  • Azure.Communication.Chat

The SDK itself can be used without C# 8.0 and has been verified to work with .NET Framework 4.6.2.

Writing Code (Part 1) - Getting an access token

Get the resource name and key from Azure Portal and store them under the names ResourceName and Key.

private async Task GetAccessTokenAsync()
{
    var ConnectionString = $"endpoint=https://{this.ResourceName}.communication.azure.com/;accesskey={this.Key}";
    this.Client = new CommunicationIdentityClient(ConnectionString);
    var userResponse = await this.Client.CreateUserAsync();
    this.User = userResponse.Value;
    var tokenResponse = await this.Client.IssueTokenAsync(this.User, scopes: new[] { CommunicationTokenScope.Chat });
    this.AccessToken = tokenResponse.Value.Token;
    var expiresOn = tokenResponse.Value.ExpiresOn;

    System.Diagnostics.Debug.WriteLine($"Created a user with ID: {this.User.Id}");
    System.Diagnostics.Debug.WriteLine($"Issued a token with 'chat' scope that expires at {expiresOn}:");
    System.Diagnostics.Debug.WriteLine(this.AccessToken);
}

"Azure.Communication.Administration.CommunicationIdentityClient" with the connection string.
Then execute "CreateUserAsync" method to create the connection user.
Then, specify the connecting user and chat in the "IssueTokenAsync" method to get the access talk.

Writing Code (Part 2) - Creating Threads
var chatClient = new ChatClient(new Uri($"https://{this.ResourceName}.communication.azure.com"), new CommunicationUserCredential(this.AccessToken));
var chatThreadMember = new ChatThreadMember(this.User)
{
    DisplayName = "UserDisplayName",
    ShareHistoryTime = DateTime.UtcNow,
};
this.Thread = await chatClient.CreateChatThreadAsync(groupId, new[] { chatThreadMember });
this.ThreadId = this.Thread.Id;

Once you have obtained the access token, new "Azure.Communication.Chat.ChatClient" specifying the access token and the endpoint of Azure.Connection.Services.
Then new "Azure.Communication.Chat.ChatThreadMember" specifying the user at the time the access token was created.
Finally, execute the CreateChatThreadAsync method and you can create a new conversation thread.

Writing Code (Part 2´) - Getting the Thread

If there is already a thread, you can also get the thread by specifying the thread ID.

var item = await chatClient.GetChatThreadAsync(this.ThreadId);
Writing Code (Part 3) - Send to Chat

You can send a message to a chat thread by executing the SendMessageAsync method of the chat thread.

internal async Task SendAsync(string content)
{
    var priority = ChatMessagePriority.Normal;
    var senderDisplayName = "sender name";

    var sendChatMessageResult = await this.Thread.SendMessageAsync(content, priority, senderDisplayName);
    System.Diagnostics.Debug.WriteLine($"Send Message: {content}");
}
Writing Code (Part 4) - Receiving from Chat

Receiving messages from the chat is a bit tricky.
I'm currently trying and running a receiving loop in another thread as follows.

this.TokenSource = new CancellationTokenSource();
Task.Factory.StartNew(async () =>
{
    DateTimeOffset? startTime = DateTimeOffset.MinValue;
    while (!this.TokenSource.IsCancellationRequested)
    {
        try
        {
            var allMessages = this.Thread.GetMessagesAsync(startTime, this.TokenSource.Token);
            await foreach (var message in allMessages)
            {
                System.Diagnostics.Debug.WriteLine($"{message.Id}:{message.Sender.Id}:{message.Content}");
                startTime = (startTime < message.CreatedOn ? message.CreatedOn : startTime).GetValueOrDefault().AddSeconds(1);
            }
        }
        catch { }
    }
});

You can receive the message by executing the GetMessagesAsync method on the thread.
The result is asynchronous streaming, so we use the C# 8.0 writing style called "await foreach (var message in allMessages)" to retrieve the received messages.
When the GetMessagesAsync method is executed, the value of the first parameter- is very important.
You can specify which time you want to get the messages after the first parameter, but you can't specify the time, so you can't specify the next message after the last received message. If you specify the latest time when you got last message, you get the last message.
So we use the following method to specify last time + 1 second.

startTime = (startTime < message.CreatedOn ? message.CreatedOn : startTime).GetValueOrDefault().AddSeconds(1);

However, there is a danger that there will be an undoing when the message arrives between the last time and +1 second.

What we've learned so far (what we don't know).

I don't know how to get the differences since the last time I received a chat message (they don't exist).
I still don't know what to specify between apps to send and receive messages in the same thread between client apps.
If you look at the Azure.Communication.Services workflow, the diagram shows that even client apps have to share information to specify the same thread between apps using AppService and so on.
f:id:hatsune_a:20200929083246p:plain
Maybe it might be difficult to achieve the cloud side with just Azure.Communication.Services, but I'll look into it some more.
Azure Communication Servicesをクライアントから使おう

azure.microsoft.com
Microsoft Ignite 2020でプレビュー公開が発表されたAzure Commucication ServicesをWPFアプリ (.NET Core) から使う方法を色々調べています。

Azure Communication Servicesとは

Azure Communication Servicesは、ビデオ、音声、チャット、テキストメッセージングなどで端末間のコミュニケーションを実現するAzure上のサービスです。

Microsoft Teamsと同じ信頼性とセキュリティが考慮されたインフラストラクチャーが採用されていて、クラウド側は特に何もコードを書かずに、アプリにTeamsのコミュニケーション機能のような機能を追加できます。

2020年10月からは、SMSでの通信や電話番号を取得して電話受発信が可能になる予定ですが、現時点でも、チャット(Teamsのチャットを思い出してください)と音声およびビデオ通話(Teamsのビデオ会議を思い出してください)がプレビュー提供されています。

まずは、チャットを試してみる

クラウド側を設定する

Azure Communication Servicesを利用する場合、Azure Portalで「Communication Services」を作成します。
f:id:hatsune_a:20200928231054p:plain
サブスクリプション、リソースグループを指定して、リソース名をつけるだけでサクッと作成できます。
f:id:hatsune_a:20200928231242p:plain
残念ながら、ロケーション(場所)はまだ米国しか選択できませんが、GAされるときには日本リージョンも指定できることを期待したいです。
作成が完了すると、
リソース名.communication.azure.com
という「エンドポイント」とそこにアクセスするための「キー」が生成されます。
アプリからは、エンドポイント+キーでAzure Communication Servicesに接続します。

クライアント側を作成する

クラウド側の準備ができたので、クライアントアプリを作成しましょう。サンプルアプリやサンプルコードなどは、WEBアプリの例ばかりでWindowsアプリだけでどこまでできるのか未知数ですが、やれるところまでやってみましょう。

WPFアプリ(.NET Core)で新規プロジェクタと作成

Visual Studio 2019を起動して、WPFアプリ (.NET Core) のテンプレートから新規アプリを作成します。.NET Coreは3.1がよいでしょう。

.NET Frameworkではなく、.NET Coreにしているのは、await foreachというC# 8.0の非同期ストリームを使いたいというのが大きな理由です。なぜ、使いたいかは後述します。

C# 8.0は、.NET Standard 2.1に対応なので、.NET Frameworkだと.NET Standard 2.1の実装バージョンが存在しないし、.NET Coreも3.0以上である必要があります。

nugetしようぜ!

新規プロジェクトが作成できたら、nugetでSDKを追加します。
f:id:hatsune_a:20200928233503p:plain
[プレビューリリースを含める]チェックボックスにチェックを入れて、次の2つのSDKを追加します。

Azure.Communication.Administration
Azure.Communication.Chat
なお、SDK自体は、C# 8.0でなくても利用可能で、.NET Framework 4.6.2でも動作することは確認済です。

コードを書く(その1) - アクセストークンの取得

Azure Portalからリソース名とキーを取得して、ResourceNameとKeyという名前で格納しておきます。

private async Task GetAccessTokenAsync()
{
    var ConnectionString = $"endpoint=https://{this.ResourceName}.communication.azure.com/;accesskey={this.Key}";
    this.Client = new CommunicationIdentityClient(ConnectionString);
    var userResponse = await this.Client.CreateUserAsync();
    this.User = userResponse.Value;
    var tokenResponse = await this.Client.IssueTokenAsync(this.User, scopes: new[] { CommunicationTokenScope.Chat });
    this.AccessToken = tokenResponse.Value.Token;
    var expiresOn = tokenResponse.Value.ExpiresOn;

    System.Diagnostics.Debug.WriteLine($"Created a user with ID: {this.User.Id}");
    System.Diagnostics.Debug.WriteLine($"Issued a token with 'chat' scope that expires at {expiresOn}:");
    System.Diagnostics.Debug.WriteLine(this.AccessToken);
}

接続文字列を指定して「Azure.Communication.Administration.CommunicationIdentityClient」をnewします。
次に「CreateUserAsync」メソッドを実行して接続ユーザーを作成します。
そして、「IssueTokenAsync」メソッドに接続ユーザーとチャットを指定してアクセストークを取得します。

コードを書く(その2) - スレッドの生成
var chatClient = new ChatClient(new Uri($"https://{this.ResourceName}.communication.azure.com"), new CommunicationUserCredential(this.AccessToken));
var chatThreadMember = new ChatThreadMember(this.User)
{
    DisplayName = "UserDisplayName",
    ShareHistoryTime = DateTime.UtcNow,
};
this.Thread = await chatClient.CreateChatThreadAsync(groupId, new[] { chatThreadMember });
this.ThreadId = this.Thread.Id;

アクセストークンが取得できたならば、そのアクセストークンとAzure.Connection.Servicesのエンドポイントを指定して「Azure.Communication.Chat.ChatClient」をnewします。
そして、アクセストークンを作ったときのユーザーを指定して「Azure.Communication.Chat.ChatThreadMember」をnewします。
最後にCreateChatThreadAsyncメソッドを実行すれば、会話スレッドが新規作成できます。

コードを書く(その2´) - スレッドの取得

すでにスレッドがある場合は、スレッドIDを指定してスレッドを取得することも可能です。

var item = await chatClient.GetChatThreadAsync(this.ThreadId);
コードを書く(その3) - チャットに送信

チャットスレッドのSendMessageAsyncメソッドを実行すると、そのチャットスレッドにメッセージを送信できます。

internal async Task SendAsync(string content)
{
    var priority = ChatMessagePriority.Normal;
    var senderDisplayName = "sender name";

    var sendChatMessageResult = await this.Thread.SendMessageAsync(content, priority, senderDisplayName);
    System.Diagnostics.Debug.WriteLine($"Send Message: {content}");
}
コードを書く(その4) - チャットから受信

チャットからのメッセージ受信は少々手こずっています。
現在試行錯誤しており、次のように別スレッドで受信ループを回しています。

this.TokenSource = new CancellationTokenSource();
Task.Factory.StartNew(async () =>
{
    DateTimeOffset? startTime = DateTimeOffset.MinValue;
    while (!this.TokenSource.IsCancellationRequested)
    {
        try
        {
            var allMessages = this.Thread.GetMessagesAsync(startTime, this.TokenSource.Token);
            await foreach (var message in allMessages)
            {
                System.Diagnostics.Debug.WriteLine($"{message.Id}:{message.Sender.Id}:{message.Content}");
                startTime = (startTime < message.CreatedOn ? message.CreatedOn : startTime).GetValueOrDefault().AddSeconds(1);
            }
        }
        catch { }
    }
});

スレッドに対するGetMessagesAsyncメソッドの実行を行うと、メッセージを受信することができます。
結果は非同期ストリーミングとなるので「await foreach (var message in allMessages)」というC# 8.0の書き方で受信したメッセージを取り出します。
なお、GetMessagesAsyncメソッド実行時の第一パラメータ―の指定値が非常に重要になります。
第一パラメータにどの時刻以降のメッセージを取得するかを指定できますが、あくまでも時刻指定なので、前回受信メッセージの次のメッセージからというような明確な指定ができません。しかも、前回取得したときの最新時刻を指定すると前回メッセージを取得していまいます。
そこで、次のようにして前回+1秒後を指定するようにしています。

startTime = (startTime < message.CreatedOn ? message.CreatedOn : startTime).GetValueOrDefault().AddSeconds(1);

しかし前回と+1秒の間にメッセージが届いたときには取りこぼしが発生しそうな危険性があります。

ここまでで分かったこと(わからないこと)

チャットのメッセージを受信するときに前回以降の差分を取得する方法が分からない(存在しない)
クライアントアプリ間で同じスレッドにメッセージを送受信するには、アプリ同士で何を指定すればよいかがまだわからない
Azure.Communication.Servicesの動作フローを見るとクライアントアプリでもAppServiceなどを使ってアプリ間で同じスレッドを指定するための情報を共有しないといけないような図となっています。
f:id:hatsune_a:20200929083246p:plain
もしかしたら、クラウド側をAzure.Communication.Servicesだけで実現するのは難しいかもしれないのですが、もう少し、調べてみようと思います。

ずっとこれを待っていた!Azure Communication Servicesプレビュー版登場!

azure.microsoft.com

I've been waiting for this for a long time, and now the Azure Communication Services preview is available!

[EN]

It's an Azure service for adding video, voice, chat and text messaging capabilities to your app.

If you used to do things like putting a WebRTC server in AppService or VM, you can leave it to Azure.

The good thing about this is that Azure takes care of security and everything else, so you don't have to worry about server operations and security audits on the app development side.

This seems to be the same grade of service that is used behind Microsoft Teams.

It's one of the big new features in Azure in conjunction with Ignite, and we'll be covering it here on the blog as we go through the material.

[JP]

ビデオ、音声、チャット、テキスト メッセージングの機能をアプリに追加するためのAzureのサービスです。

いままでだったら、AppServiceやVMにWebRTCサーバーを入れてみたいなことをやっていたのがAzureにお任せできます。

これのいいところはセキュリティなどもろもろをAzure側が担保してくれるので、アプリ開発側でのサーバー運用やセキュリティ監査が大幅に軽減できる点です。

これ、Microsoft Teamsの裏側で使われているのと同じグレードのサービスといえるようです。

IgniteにあわせたAzureの新機能の中でも大注目の1つなので、資料をを見ながら、このブログでもご紹介していく予定です。


.NET 5.0リリース候補版(RC)が公開されました。

devblogs.microsoft.com

.NET Core 3.1の後継になる.NET 5.0のリリース候補版が公開されました。

Visual Studioから使いたいときは、Visual Studio 2019 (v16.8, Preview 3)をインストールするとよいみたいです。


.NET 5.0の良いところは、WPFWindows Form、UWP、Xamarin、Unityなどのクライアントアプリの共通フレームワークとして居続けられる点です(ASP.NETも)。

そして、生成するバイナリとしては、x86/x64/ARMに加えてARM64にも対応しており、WindowsLinuxMac向けに単一ファイルで実行可能(つまり必要な.NET 5なDLLも含んだ実行ファイル)の生成に対応している点も大きいでしょう。

長期サポート版は.NET 6.0までは提供されないようですが、いまから、.NET 5.0で動くようなコードを前提として準備しておくのがいいと思います。


私のMicrosoft Ignite 2020視聴法


Microsoft Ignite 2020が始まりまりました。

Microsoft Buildが開発者向けだとしたら、Microsoft IgniteはITプロ向けとややインフラよりですが、Azureなどを使って開発するのであれば、そのインフラの最新情報を得られるIgniteは重要なイベントですね。

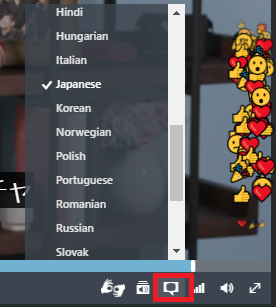
今回、自動翻訳字幕の機能がありますので、これをONにするとセッション内容の理解も進むかもしれません。

f:id:hatsune_a:20200923003847p:plain


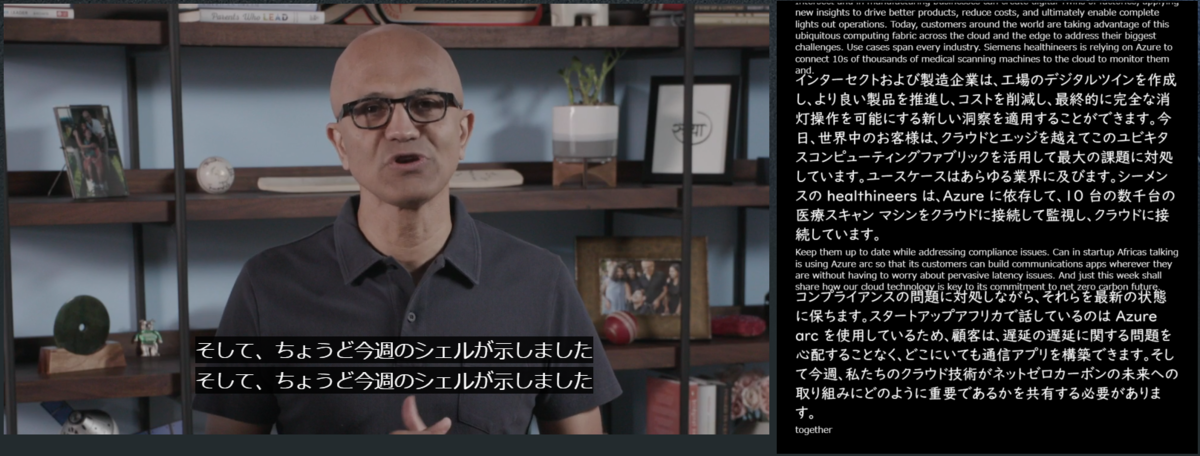
若干タイムラグがあるので、Azure Cognitive Services - Speechで音声認識してTranslatorで翻訳するアプリがありましたので、それを使って字幕を画面横に表示してみました。 

f:id:hatsune_a:20200923003638p:plain

 とても良い感じですね。

字幕を読むというよりも、聞き取れなかった音声の英単語をみてみたり、単語見てもわからないときは「さっ」と日本語翻訳文を一読したりすると理解が進みますね。

Microsoft Ignite 2020

日本語は後半にあります。


[EN]

https://myignite.microsoft.com/

Soon, Microsoft Ignite 2020 will start at 0:15 on 9/23 Japan time (9/22 - 9/25 local time).

Compared to Microsoft Build 2020, which was held right after the new coronavirus began to take effect, the repeat sessions have been arranged to make it easier to see the event in time zones other than the Seattle local time zone.

In addition, the official website is very easy to understand, with time stamps and time displays.

About the Keynote
The next three episodes of the keynote session, "Building Digital Resilience" by Satya's CEO are scheduled to be broadcast in the next three sessions.

9/23 00:15 JST-01:15 JST

9/23 08:15 JST-09:15 JST

9/23 16:15 JST-17:15 JST

In the Japanese time zone, I think it's easy to see the time around the second session. The other sessions are generally similar.

By the way, when you say "digital resilience," do you mean resilience and business continuity in a digital society? I wonder if you could share your insights from the perspective of creating something that will allow companies to continue their business, including infrastructure?

Recommended Sessions
I'm not recommending it, but here's the list of sessions I plan to watch at the moment. I've highlighted the key words of interest in red.


{JP}

https://myignite.microsoft.com/

まもなく日本時間の9/23の0:15からMicrosoft Ignite 2020がスタートします(現地時間で9/22~9/25)。

新型コロナウィルスの影響が出始めた直後に開催されたMicrosoft Build 2020と比べるとシアトル現地時間帯以外のタイムゾーンでも見やすいようにリピートセッションが組まれています。

また、公式サイトも時差込みに時刻表示もできるようになっており非常にわかりやすいです。

キーノートについて

キーノートセッションともいえるサティアCEOによる「Building Digital Resilience(デジタルレジリエンスの構築)」は、次の3回の放送が予定されています。

9/23 00:15 JST-01:15 JST

9/23 08:15 JST-09:15 JST

9/23 16:15 JST-17:15 JST

日本のタイムゾーンだと2回目あたりの時間が見やすいと思います。他のセッションもおおむねそんな感じですね。

ちなみにデジタルレジリエンスというのは、デジタル社会による復元力や事業継続性というような感じなのでしょうしょうか。インフラも含めて企業の事業を継続できるようなものを作り上げるというような視点の知見をお話いただける感じかな?

おすすめセッション

おすすめということでもないのですが、現時点で視聴予定のセッションリストは次のような感じです。注目キーワードは赤くしてみました。


既存アプリのファイルを確実に上書きインストールするmsiを作成するには

本記事は、Visual Studio Installerプロジェクトで作成したmsiファイルで、既存のファイルのファイルバージョンが新しくても上書きインストールする方法について記述しています。

This article is about the msi created by the Visual Studio Installer project How to overwrite an existing file with a newer file version in a file This section describes the

[EN]日本語原文は下にあるのでスクロールしてね

When you use Visual Studio Installer to create an msi file, you can usually upgrade the version of the installer project by upgrading the file version of the EXE itself, which allows you to install updates to existing applications.

However, if the version of a dll that has already been installed is new and you want to put it back, the installer does not overwrite the dlls in question, resulting in a version mismatch and a missing dll error.

This can be caused by the installer's overwriting strategy, which can result in a "file doesn't exist or an older version of Reinstall only if the file exists. This is because the file does not exist.


So let's try to solve the child problem by rewriting the msi file that was built and created using orca.

Where is orca?

C:\Program Files (x86)\Windows Kits\10\bin\10.0.19041.0\x86  

In the x86 execution folder of the latest SDK, there is an "Orca-x86_en-us.msi" file. Once installed, it is ready to run.

Rewriting msi files with orca

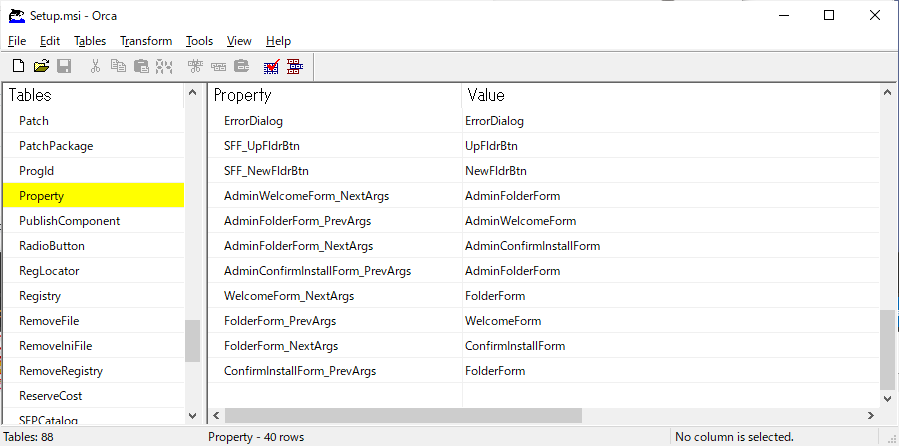
f:id:hatsune_a:20200706221405p:plainAfter starting orca, select the Property.

The REINSTALLMODE property is not set by default, so add it with ADD ROW.

The default value is "omus", where "o" means "the file doesn't exist or the version is old". Perform reinstallation only if the file exists. Therefore, "d" = "The file does not exist or a different version of the file Perform a re-installation if a "dmus" is present. Set dmus as "dmus", save and close it.

Double-clicking the msi file without closing it will result in an error, so be sure to close it.

Confirmation of operation

  • New Installation
    → success 
  • Installing an update to an older version (some DLL file versions are newer)
    → Success (the new DLL file was also overwritten by the one in the msi file)
  • Double-click on the same msi file after installation
    →You can choose to repair or delete.
  • Deleting some dll files after installation and launching the application
    →Installer repaired it and it's OK to start

 That doesn't seem to be a problem.


[JP]

Visual Studio Installerを使ってmsiファイルを作成したときに、通常は、EXE自体のファイルバージョンをあげて、インストーラープロジェクトのVersionをあげることで、既存アプリの更新インストールが可能になります。

しかし、既存インストール済の一部のdllのバージョンが新しくなっていてそれを戻したいときなどは、該当のdllが上書きされず、結果、バージョンが一致せずにdllがないようなエラーが出てしまうときがあります。

これは、インストーラーの上書き戦略が「ファイルが存在しない、またはバージョンの古いファイルが存在する場合のみ再インストールを実行します。」となっているからです。


そこで、ビルドして出来上がったmsiファイルをorcaを使って書き換えることで、子の問題を解決してみましょう。

orcaはどこにいる?

C:\Program Files (x86)\Windows Kits\10\bin\10.0.19041.0\x86

最新のSDKx86実行フォルダに「Orca-x86_en-us.msi」があるので、インストールすると実行できます。

orcamsiファイルを書き換える

f:id:hatsune_a:20200706221405p:plain

orcaを起動したらPropertyを選択します。

REINSTALLMODEプロパティはデフォルトでは設定されていないのでADD ROWで追加します。

デフォルト値はomusで、ここの「o」が「ファイルが存在しない、またはバージョンの古いファイルが存在する場合のみ再インストールを実行します。」の意味になりますので、「d」=「ファイルが存在しない、またはバージョンの異なるファイルが存在する場合再インストールを実行します。」としてdmusを設定し、保存してクローズします。

クローズせずにmsiファイルをダブルクリックするとエラーになりますので必ずクローズしましょう。

動作確認

■新規インストール

→成功 

■古いバージョン(一部のDLLファイルバージョンは新しい)への更新インストール

→成功(新しいDLLファイルもmsiファイル内のものに上書きされていた)

■インストール後に同じmsiファイルをダブルクリック

→修復と削除が選べる

■インストール後に一部のdllファイルを削除してアプリ起動

インストーラーが修復してくれて起動OK


問題なさそうですね。