はつねの日記

Kinect, Windows 10 UWP, Windows Azure, IoT, 電子工作

Azure PortalのDiagnose and solve problems機能がすごい!

Azure PortalでSignalR Serviceの設定を色々みていたときに、ほんのちょっとの興味から[Diagnose and solve problems]をクリックしたらすごかった。

f:id:hatsune_a:20201027090909p:plain
選択式ではありますがUIがChatbotなんです。なにこれすごい(語彙www)。
ちなみにジーニーさんというらしいですよ。
ちょっとやりとりを翻訳してみましょう。

                                                                                  • -

[ジーニーさん]
こんにちは!Azure SignalRサービス診断のご紹介です。Azure SignalRサービス診断へようこそ! 私の名前はジーニーといいます。
ここでは、私がお手伝いできる可用性とパフォーマンスに関連した問題をいくつかご紹介します。あなたの問題を最もよく説明するタイルを選択してください。
[はつね]
診断設定チェックに興味がある
[ジーニーさん]
あなたのアプリを分析する間、少し時間をくださいこのタイルに関連する問題のために。検出器がロードされたら、ご自由にクリックして各トピックを調査してください。
・Connectivity log is enabled
・Messaging log is enabled

                                                                                  • -

これなら、チャットで!とかかかれているけど英語チャットとか無理!みたいなときも楽しく使えますね!

A virtual camera was added in OBS Studio v26.0.0.

この記事は「OBS Studio v26.0.0で仮想カメラが追加されました。 - はつねの日記」の英語翻訳となります。
This article is an English translation of "https://hatsune.hatenablog.jp/archive/2020/10/04".

OBS Studio is an open source software for open source live streaming and recording.
obsproject.com

Until now, a plugin like OSB Virtual-Cam was required to input the output screen created in OBS Studio (called the broadcast screen in OBS Studio) as a self-camera image of a remote conference system such as Teams. The plug-in adds a camera device named "OBS Camera" and allows you to specify it to be used as a self-camera image.

Although it is a very convenient function, there was a drawback that it was difficult to understand the operation and the state of operation, such as starting from the "Tools" menu because it is a plug-in.
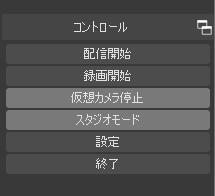
However, in the V26.0.0 update, the function was implemented in OBS Studio, and you can now easily turn the virtual camera output on and off from the control menu.
f:id:hatsune_a:20201004061147p:plain

When you install OBS Studio V26.0.0, for example, the option "OBS Virtual Camera" will be added to the "Camera" in the "Show Device Settings" menu in Teams.
f:id:hatsune_a:20201004061401p:plain
Once this is added, simply click the "Start Virtual Camera" button on the OBS Studio side to output the OBS Studio broadcast screen as a camera image.

What's more, even when the virtual camera is not running, the OBS Studio mark is output together with the mark indicating that the camera is not broadcasting, so you can check that the video is coming even before the virtual camera is started in OBS Studio, so you can use it with great confidence.

f:id:hatsune_a:20201004062324p:plain

And importantly, when you exit OBS Studio, it stops the virtual camera before you exit.
f:id:hatsune_a:20201004062200p:plain
In the plugin, I've had problems with Teams getting stuck if I don't stop OBS Studio after the virtual camera has been terminated.
In OBS Studio (I don't know about the Mac version, but at least on Windows), OBS Studio doesn't detect the insertion and removal of external devices such as a USB camera (for example, the ATEM Mini with HDMI capture), so I often have to restart OBS Studio to update the device status when inserting and removing external devices.
This seems to get rid of things like rebooting without stopping the virtual camera and restarting Teams as well.

Since it's V26.0.0, it's the first in the V26 series, so maybe there are some bugs and degrades that haven't been crushed, but I think it's significant to start using V26 for this feature alone.

OBS Studio v26.0.0で仮想カメラが追加されました。

OBS Studioは、オープンソースライブ配信や録画に便利なオープンソースソフトウェアです。
obsproject.com

従来、OBS Studioで作成した出力画面(OBS Studioでは放送画面といいます)をTeamsなどのリモート会議システムの自カメラ映像として入力するには、OSB Virtual-Camのようなプラグインが必要でした。プラグインを導入すると「OBS Camera」という名前のカメラデバイスが追加され、それを指定することで自カメラ映像として利用できます。

非常に便利な機能ですが、プラグインなので「ツール」メニューから起動など若干操作や動作状態がわかりづらいという難点がありました。
しかし、V26.0.0のアップデートでOBS Studio本体にその機能が実装されて、コントロールメニューから簡単に仮想カメラ出力のON/OFFが可能になりました。
f:id:hatsune_a:20201004061147p:plain

OBS Studio V26.0.0をインストールすると、例えば、Teamsの「デバイス設定を表示する」メニューの中の「カメラ」に「OBS Virtual Camera」という選択肢が追加されます。f:id:hatsune_a:20201004061401p:plain
こちらを追加すれば、あとは、OBS Studio側で「仮想カメラ開始」ボタンをクリックするだけで、OBS Studioの放送画面がカメラ映像として出力されます

さらに便利なのは、仮想カメラが開始していないときでもOBS Studioマークが放送していないことを意味するマークと一緒に出力されているためOBS Studioで仮想カメラを開始する前でも映像がきていることを確認できるので、非常に安心して使うことができます。
f:id:hatsune_a:20201004062324p:plain

そして、重要なことはOBS Studioを終了するときに仮想カメラを止めてから終了してくれる点です。
f:id:hatsune_a:20201004062200p:plain
プラグインでは仮想カメラの終了処理はしてからOBS Studioを止めないと、Teamsが固まってしまうという問題がでることがありました。
OBS Studio (Mac版はわかりませんが少なくともWindows版では)は、USBカメラなどの外付けデバイス(例えばATEM MiniなどでHDMIキャプチャしたものを入力している場合も)などの抜き差しをOBS Studioが検知しないので、外付けデバイスの抜き差し時はOBS Studioの再起動を行ってデバイス状態の最新化をするときがよくあります。
これで、仮想カメラを止めずに再起動してしまってTeamsも再起動のようなことから脱却できそうです。

V26.0.0ということでV26系の初物ですから、もしかしたら、潰し切れていないバグやデグレードなどもあるかもしれませんが、この機能だけでもV26を使い始める意味は大きいと思います。

Let's use Azure Communication Services from the client

この記事は「Azure Communication Servicesをクライアントから使おう - はつねの日記」の英語翻訳となります。
This article is an English translation of "https://hatsune.hatenablog.jp/entry/2020/09/29/004734".
azure.microsoft.com
I'm looking into various ways to use Azure Commucication Services, which was announced for preview release at Microsoft Ignite 2020, through WPF apps (.NET Core).

What is Azure Communication Services?

Azure Communication Services is a service on Azure that enables communication between devices with video, voice, chat and text messaging.

It uses the same reliability and security-conscious infrastructure as Microsoft Teams, and the cloud side can add features like Teams' communication features to the app without writing any specific code.

Starting in October 2020, you'll be able to communicate via SMS and capture phone numbers to make and receive calls, but as of now, chat (remember Teams' chat) and voice and video calls (remember Teams' video conferencing) are still available in preview.

Try Chat first.

Configure the cloud side

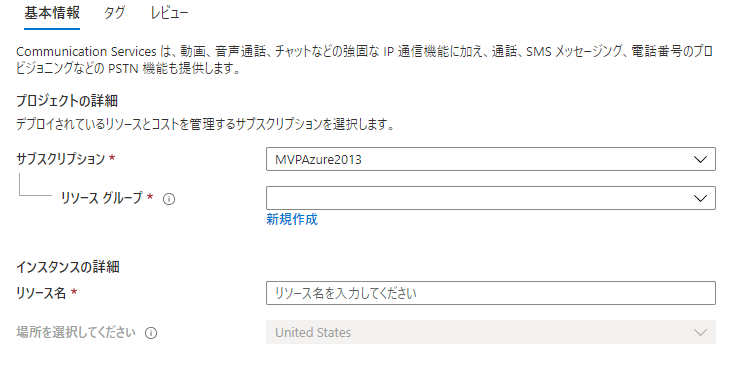
If you want to use Azure Communication Services, create "Communication Services" in Azure Portal.
f:id:hatsune_a:20200928231054p:plain
Just specify a subscription, resource group, and name the resource to quickly create it.
f:id:hatsune_a:20200928231242p:plain
Unfortunately, you can only select the location (location) in the US yet, but we hope to be able to specify the Japanese region when the GA.
Once the creation is complete, you'll be able to create a
Resource name.communication.azure.com
An "endpoint" called "Endpoint" and a "key" to access it will be generated.
From the app, connect to Azure Communication Services with the endpoint + key.

Create the client side.

Now that we have the cloud side ready, let's create a client app. Sample apps and sample code are all examples of web apps and it's unknown how far we can go with just a Windows app, but let's try to do it as far as we can.

New Projector and Creation in WPF App (.NET Core)

Launch Visual Studio 2019 and create a new app from a WPF app (.NET Core) template. NET Core should be 3.1.

The main reason we're using .NET Core instead of .NET Framework is that we want to use a C# 8.0 asynchronous stream called await foreach. I'll explain why we want to use it later.

C# 8.0 is compatible with .NET Standard 2.1, so with the .NET Framework, there is no .NET Standard 2.1 implementation version, and .NET Core must be 3.0 or higher.

Let's nuget!

Once the new project is created, add the SDK in nuget.
f:id:hatsune_a:20200928233503p:plain
Check the Include Preview Release checkbox to add the following two SDKs

  • Azure.Communication.Administration
  • Azure.Communication.Chat

The SDK itself can be used without C# 8.0 and has been verified to work with .NET Framework 4.6.2.

Writing Code (Part 1) - Getting an access token

Get the resource name and key from Azure Portal and store them under the names ResourceName and Key.

private async Task GetAccessTokenAsync()
{
    var ConnectionString = $"endpoint=https://{this.ResourceName}.communication.azure.com/;accesskey={this.Key}";
    this.Client = new CommunicationIdentityClient(ConnectionString);
    var userResponse = await this.Client.CreateUserAsync();
    this.User = userResponse.Value;
    var tokenResponse = await this.Client.IssueTokenAsync(this.User, scopes: new[] { CommunicationTokenScope.Chat });
    this.AccessToken = tokenResponse.Value.Token;
    var expiresOn = tokenResponse.Value.ExpiresOn;

    System.Diagnostics.Debug.WriteLine($"Created a user with ID: {this.User.Id}");
    System.Diagnostics.Debug.WriteLine($"Issued a token with 'chat' scope that expires at {expiresOn}:");
    System.Diagnostics.Debug.WriteLine(this.AccessToken);
}

"Azure.Communication.Administration.CommunicationIdentityClient" with the connection string.
Then execute "CreateUserAsync" method to create the connection user.
Then, specify the connecting user and chat in the "IssueTokenAsync" method to get the access talk.

Writing Code (Part 2) - Creating Threads
var chatClient = new ChatClient(new Uri($"https://{this.ResourceName}.communication.azure.com"), new CommunicationUserCredential(this.AccessToken));
var chatThreadMember = new ChatThreadMember(this.User)
{
    DisplayName = "UserDisplayName",
    ShareHistoryTime = DateTime.UtcNow,
};
this.Thread = await chatClient.CreateChatThreadAsync(groupId, new[] { chatThreadMember });
this.ThreadId = this.Thread.Id;

Once you have obtained the access token, new "Azure.Communication.Chat.ChatClient" specifying the access token and the endpoint of Azure.Connection.Services.
Then new "Azure.Communication.Chat.ChatThreadMember" specifying the user at the time the access token was created.
Finally, execute the CreateChatThreadAsync method and you can create a new conversation thread.

Writing Code (Part 2´) - Getting the Thread

If there is already a thread, you can also get the thread by specifying the thread ID.

var item = await chatClient.GetChatThreadAsync(this.ThreadId);
Writing Code (Part 3) - Send to Chat

You can send a message to a chat thread by executing the SendMessageAsync method of the chat thread.

internal async Task SendAsync(string content)
{
    var priority = ChatMessagePriority.Normal;
    var senderDisplayName = "sender name";

    var sendChatMessageResult = await this.Thread.SendMessageAsync(content, priority, senderDisplayName);
    System.Diagnostics.Debug.WriteLine($"Send Message: {content}");
}
Writing Code (Part 4) - Receiving from Chat

Receiving messages from the chat is a bit tricky.
I'm currently trying and running a receiving loop in another thread as follows.

this.TokenSource = new CancellationTokenSource();
Task.Factory.StartNew(async () =>
{
    DateTimeOffset? startTime = DateTimeOffset.MinValue;
    while (!this.TokenSource.IsCancellationRequested)
    {
        try
        {
            var allMessages = this.Thread.GetMessagesAsync(startTime, this.TokenSource.Token);
            await foreach (var message in allMessages)
            {
                System.Diagnostics.Debug.WriteLine($"{message.Id}:{message.Sender.Id}:{message.Content}");
                startTime = (startTime < message.CreatedOn ? message.CreatedOn : startTime).GetValueOrDefault().AddSeconds(1);
            }
        }
        catch { }
    }
});

You can receive the message by executing the GetMessagesAsync method on the thread.
The result is asynchronous streaming, so we use the C# 8.0 writing style called "await foreach (var message in allMessages)" to retrieve the received messages.
When the GetMessagesAsync method is executed, the value of the first parameter- is very important.
You can specify which time you want to get the messages after the first parameter, but you can't specify the time, so you can't specify the next message after the last received message. If you specify the latest time when you got last message, you get the last message.
So we use the following method to specify last time + 1 second.

startTime = (startTime < message.CreatedOn ? message.CreatedOn : startTime).GetValueOrDefault().AddSeconds(1);

However, there is a danger that there will be an undoing when the message arrives between the last time and +1 second.

What we've learned so far (what we don't know).

I don't know how to get the differences since the last time I received a chat message (they don't exist).
I still don't know what to specify between apps to send and receive messages in the same thread between client apps.
If you look at the Azure.Communication.Services workflow, the diagram shows that even client apps have to share information to specify the same thread between apps using AppService and so on.
f:id:hatsune_a:20200929083246p:plain
Maybe it might be difficult to achieve the cloud side with just Azure.Communication.Services, but I'll look into it some more.

Azure Communication Servicesをクライアントから使おう

azure.microsoft.com
Microsoft Ignite 2020でプレビュー公開が発表されたAzure Commucication ServicesをWPFアプリ (.NET Core) から使う方法を色々調べています。

Azure Communication Servicesとは

Azure Communication Servicesは、ビデオ、音声、チャット、テキストメッセージングなどで端末間のコミュニケーションを実現するAzure上のサービスです。

Microsoft Teamsと同じ信頼性とセキュリティが考慮されたインフラストラクチャーが採用されていて、クラウド側は特に何もコードを書かずに、アプリにTeamsのコミュニケーション機能のような機能を追加できます。

2020年10月からは、SMSでの通信や電話番号を取得して電話受発信が可能になる予定ですが、現時点でも、チャット(Teamsのチャットを思い出してください)と音声およびビデオ通話(Teamsのビデオ会議を思い出してください)がプレビュー提供されています。

まずは、チャットを試してみる

クラウド側を設定する

Azure Communication Servicesを利用する場合、Azure Portalで「Communication Services」を作成します。
f:id:hatsune_a:20200928231054p:plain
サブスクリプション、リソースグループを指定して、リソース名をつけるだけでサクッと作成できます。
f:id:hatsune_a:20200928231242p:plain
残念ながら、ロケーション(場所)はまだ米国しか選択できませんが、GAされるときには日本リージョンも指定できることを期待したいです。
作成が完了すると、
リソース名.communication.azure.com
という「エンドポイント」とそこにアクセスするための「キー」が生成されます。
アプリからは、エンドポイント+キーでAzure Communication Servicesに接続します。

クライアント側を作成する

クラウド側の準備ができたので、クライアントアプリを作成しましょう。サンプルアプリやサンプルコードなどは、WEBアプリの例ばかりでWindowsアプリだけでどこまでできるのか未知数ですが、やれるところまでやってみましょう。

WPFアプリ(.NET Core)で新規プロジェクタと作成

Visual Studio 2019を起動して、WPFアプリ (.NET Core) のテンプレートから新規アプリを作成します。.NET Coreは3.1がよいでしょう。

.NET Frameworkではなく、.NET Coreにしているのは、await foreachというC# 8.0の非同期ストリームを使いたいというのが大きな理由です。なぜ、使いたいかは後述します。

C# 8.0は、.NET Standard 2.1に対応なので、.NET Frameworkだと.NET Standard 2.1の実装バージョンが存在しないし、.NET Coreも3.0以上である必要があります。

nugetしようぜ!

新規プロジェクトが作成できたら、nugetでSDKを追加します。
f:id:hatsune_a:20200928233503p:plain
[プレビューリリースを含める]チェックボックスにチェックを入れて、次の2つのSDKを追加します。

Azure.Communication.Administration
Azure.Communication.Chat
なお、SDK自体は、C# 8.0でなくても利用可能で、.NET Framework 4.6.2でも動作することは確認済です。

コードを書く(その1) - アクセストークンの取得

Azure Portalからリソース名とキーを取得して、ResourceNameとKeyという名前で格納しておきます。

private async Task GetAccessTokenAsync()
{
    var ConnectionString = $"endpoint=https://{this.ResourceName}.communication.azure.com/;accesskey={this.Key}";
    this.Client = new CommunicationIdentityClient(ConnectionString);
    var userResponse = await this.Client.CreateUserAsync();
    this.User = userResponse.Value;
    var tokenResponse = await this.Client.IssueTokenAsync(this.User, scopes: new[] { CommunicationTokenScope.Chat });
    this.AccessToken = tokenResponse.Value.Token;
    var expiresOn = tokenResponse.Value.ExpiresOn;

    System.Diagnostics.Debug.WriteLine($"Created a user with ID: {this.User.Id}");
    System.Diagnostics.Debug.WriteLine($"Issued a token with 'chat' scope that expires at {expiresOn}:");
    System.Diagnostics.Debug.WriteLine(this.AccessToken);
}

接続文字列を指定して「Azure.Communication.Administration.CommunicationIdentityClient」をnewします。
次に「CreateUserAsync」メソッドを実行して接続ユーザーを作成します。
そして、「IssueTokenAsync」メソッドに接続ユーザーとチャットを指定してアクセストークを取得します。

コードを書く(その2) - スレッドの生成
var chatClient = new ChatClient(new Uri($"https://{this.ResourceName}.communication.azure.com"), new CommunicationUserCredential(this.AccessToken));
var chatThreadMember = new ChatThreadMember(this.User)
{
    DisplayName = "UserDisplayName",
    ShareHistoryTime = DateTime.UtcNow,
};
this.Thread = await chatClient.CreateChatThreadAsync(groupId, new[] { chatThreadMember });
this.ThreadId = this.Thread.Id;

アクセストークンが取得できたならば、そのアクセストークンとAzure.Connection.Servicesのエンドポイントを指定して「Azure.Communication.Chat.ChatClient」をnewします。
そして、アクセストークンを作ったときのユーザーを指定して「Azure.Communication.Chat.ChatThreadMember」をnewします。
最後にCreateChatThreadAsyncメソッドを実行すれば、会話スレッドが新規作成できます。

コードを書く(その2´) - スレッドの取得

すでにスレッドがある場合は、スレッドIDを指定してスレッドを取得することも可能です。

var item = await chatClient.GetChatThreadAsync(this.ThreadId);
コードを書く(その3) - チャットに送信

チャットスレッドのSendMessageAsyncメソッドを実行すると、そのチャットスレッドにメッセージを送信できます。

internal async Task SendAsync(string content)
{
    var priority = ChatMessagePriority.Normal;
    var senderDisplayName = "sender name";

    var sendChatMessageResult = await this.Thread.SendMessageAsync(content, priority, senderDisplayName);
    System.Diagnostics.Debug.WriteLine($"Send Message: {content}");
}
コードを書く(その4) - チャットから受信

チャットからのメッセージ受信は少々手こずっています。
現在試行錯誤しており、次のように別スレッドで受信ループを回しています。

this.TokenSource = new CancellationTokenSource();
Task.Factory.StartNew(async () =>
{
    DateTimeOffset? startTime = DateTimeOffset.MinValue;
    while (!this.TokenSource.IsCancellationRequested)
    {
        try
        {
            var allMessages = this.Thread.GetMessagesAsync(startTime, this.TokenSource.Token);
            await foreach (var message in allMessages)
            {
                System.Diagnostics.Debug.WriteLine($"{message.Id}:{message.Sender.Id}:{message.Content}");
                startTime = (startTime < message.CreatedOn ? message.CreatedOn : startTime).GetValueOrDefault().AddSeconds(1);
            }
        }
        catch { }
    }
});

スレッドに対するGetMessagesAsyncメソッドの実行を行うと、メッセージを受信することができます。
結果は非同期ストリーミングとなるので「await foreach (var message in allMessages)」というC# 8.0の書き方で受信したメッセージを取り出します。
なお、GetMessagesAsyncメソッド実行時の第一パラメータ―の指定値が非常に重要になります。
第一パラメータにどの時刻以降のメッセージを取得するかを指定できますが、あくまでも時刻指定なので、前回受信メッセージの次のメッセージからというような明確な指定ができません。しかも、前回取得したときの最新時刻を指定すると前回メッセージを取得していまいます。
そこで、次のようにして前回+1秒後を指定するようにしています。

startTime = (startTime < message.CreatedOn ? message.CreatedOn : startTime).GetValueOrDefault().AddSeconds(1);

しかし前回と+1秒の間にメッセージが届いたときには取りこぼしが発生しそうな危険性があります。

ここまでで分かったこと(わからないこと)

チャットのメッセージを受信するときに前回以降の差分を取得する方法が分からない(存在しない)
クライアントアプリ間で同じスレッドにメッセージを送受信するには、アプリ同士で何を指定すればよいかがまだわからない
Azure.Communication.Servicesの動作フローを見るとクライアントアプリでもAppServiceなどを使ってアプリ間で同じスレッドを指定するための情報を共有しないといけないような図となっています。
f:id:hatsune_a:20200929083246p:plain
もしかしたら、クラウド側をAzure.Communication.Servicesだけで実現するのは難しいかもしれないのですが、もう少し、調べてみようと思います。

ずっとこれを待っていた!Azure Communication Servicesプレビュー版登場!

azure.microsoft.com

I've been waiting for this for a long time, and now the Azure Communication Services preview is available!

[EN]

It's an Azure service for adding video, voice, chat and text messaging capabilities to your app.

If you used to do things like putting a WebRTC server in AppService or VM, you can leave it to Azure.

The good thing about this is that Azure takes care of security and everything else, so you don't have to worry about server operations and security audits on the app development side.

This seems to be the same grade of service that is used behind Microsoft Teams.

It's one of the big new features in Azure in conjunction with Ignite, and we'll be covering it here on the blog as we go through the material.

[JP]

ビデオ、音声、チャット、テキスト メッセージングの機能をアプリに追加するためのAzureのサービスです。

いままでだったら、AppServiceやVMにWebRTCサーバーを入れてみたいなことをやっていたのがAzureにお任せできます。

これのいいところはセキュリティなどもろもろをAzure側が担保してくれるので、アプリ開発側でのサーバー運用やセキュリティ監査が大幅に軽減できる点です。

これ、Microsoft Teamsの裏側で使われているのと同じグレードのサービスといえるようです。

IgniteにあわせたAzureの新機能の中でも大注目の1つなので、資料をを見ながら、このブログでもご紹介していく予定です。


.NET 5.0リリース候補版(RC)が公開されました。

devblogs.microsoft.com

.NET Core 3.1の後継になる.NET 5.0のリリース候補版が公開されました。

Visual Studioから使いたいときは、Visual Studio 2019 (v16.8, Preview 3)をインストールするとよいみたいです。


.NET 5.0の良いところは、WPFWindows Form、UWP、Xamarin、Unityなどのクライアントアプリの共通フレームワークとして居続けられる点です(ASP.NETも)。

そして、生成するバイナリとしては、x86/x64/ARMに加えてARM64にも対応しており、WindowsLinuxMac向けに単一ファイルで実行可能(つまり必要な.NET 5なDLLも含んだ実行ファイル)の生成に対応している点も大きいでしょう。

長期サポート版は.NET 6.0までは提供されないようですが、いまから、.NET 5.0で動くようなコードを前提として準備しておくのがいいと思います。